Add your promotional text...
How to Take Moving Shots with Insta360 Pro 2
How to Take Moving Shots with Insta360 Pro 2
Viral Gala
9/24/20252 min read
The Invisible Filmmaker: How to Take Seamless Moving Shots with the Insta360 Pro 2
The world of 360° VR filming is thrilling, but it comes with a unique and infuriating challenge: moving shots. How do you achieve smooth, realistic, eye-level movement when there's literally nowhere to hide?
As Viral Gala from 360 VR Photography, I've spent years tackling this exact issue. Here’s a breakdown of the common frustrations and the ingenious, practical solution we developed to master the art of the moving 360° shot.
🛑 The Limitations of Common 360° Movement Techniques
When trying to move the Insta360 Pro 2 through a scene, most methods fall short:
Handheld or Tripod Movement at Eye Level: The operator is always visible, compromising the immersive experience.
High Tripod Movement (The "Floating" Shot): The footage feels unnatural, creating a disconcerting "ghost" or "floating" perspective, which is generally discouraged for realistic VR (Source: Reddit Thread on Staying Out of View).
Post-Production Patching (The Editing Nightmare): Digitally painting the operator out is an incredible drain on time, often taking many hours per shot, especially in complex environments with shadows and reflections (Source: YouTube Tutorial on Object Removal in 360 Video).
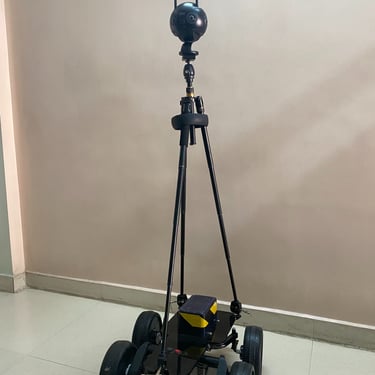
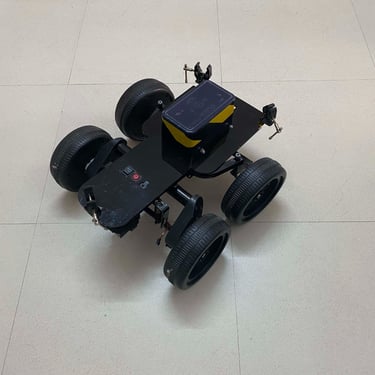
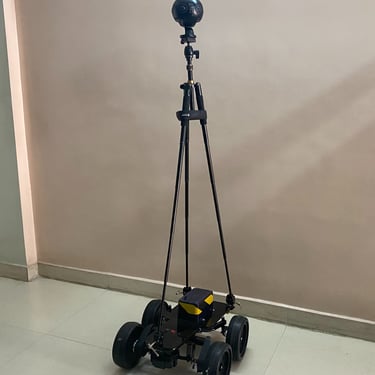
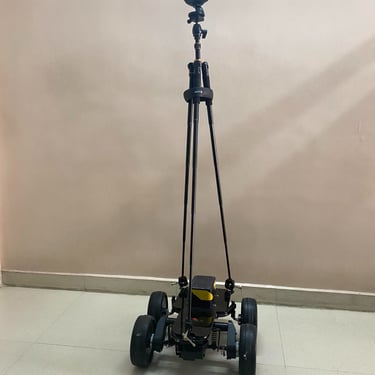
💡 The 360 VR Photography Solution: The RC Robot Car
To deliver perfectly smooth, realistic, and truly invisible moving shots, we engineered a better solution: a custom-built RC (Remote Control) robot car.
We essentially created a self-driving camera dolly that removes the human element from the frame entirely.
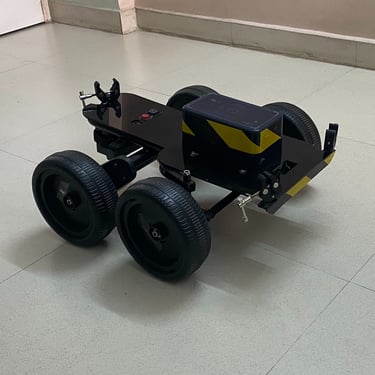
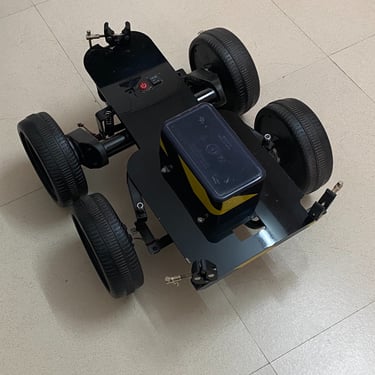
Our Custom Robot Car Specs:
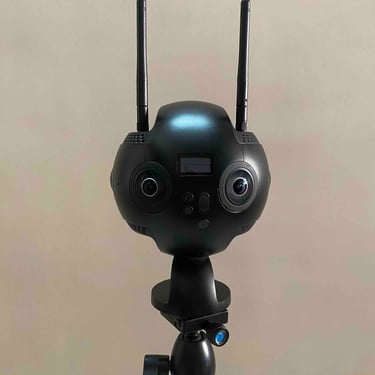
Remote Operating Range: A wide $500 \text{m}$ control radius for expansive scenes.
Payload Capacity: Robust $30 \text{kg}$ capacity, easily handling the Insta360 Pro 2 plus a stabilizer or heavy tripod.
Key Feature: Suspension System: This is critical! The suspension ensures the movement remains perfectly stable and smooth, eliminating the jarring jitters you get from handheld movement (Source: Facebook AI Research on 360 Stabilization—highlighting the need for advanced smoothing techniques).
How It Works:
By mounting the Insta360 Pro 2 securely at human eye-level on the robot car, the camera moves seamlessly through the scene, while the operator remains safely outside the 360° capture radius. This method provides the following advantages:
✅ Realistic Perspective: Maintains that crucial, natural human eye-level view for true immersion.
✅ Stable Movement: The suspension system provides a professional dolly-like glide.
✅ Operator Elimination: The operator is simply not in the footage, reducing post-work to zero.
✅ Industry Validation: The concept of using RC vehicles for invisible, low-angle 360 shots is a recognized, advanced technique among the creative community (Source: Reddit Discussion on RC Car Camera Mounts).
✨ Viral Gala’s Final Tips for Mastering 360° Movement
Moving shots require precision and planning. Here are a few must-do steps from our team at 360 VR Photography:
Test Your Path Thoroughly: Always run the course without the camera first. Look for minor bumps, cables, or cracks—even small obstacles can ruin a 360° shot.
Ensure Maximum Security: Double- and triple-check that the camera is secured tightly to the robot car mount or tripod head. The Pro 2 is too valuable to risk.
Sync with Storyboard: If the movement is timed with people or action, rehearse the movement speed to sync perfectly with your script or shot plan.
Review On-Site: Review the footage immediately using VR goggles or a monitor to confirm the movement is smooth and the operator is completely out of the frame before wrapping the shoot.
Need expert moving shots for your next VR project? Contact Viral Gala at 360 VR Photography today!
Website: 360vrphotography.com
Contact: 9920322366.


Experience
Engaging virtual tours for real estate and events.
Innovative
info@360vrphotography.in
+91 9920322366